Administering Teams Policy Allocation Using Groups, Power Platform and Azure Runbooks
- Kyle Anderson

- Jul 30, 2020
- 7 min read
Updated: Oct 7, 2020
Disclaimer: This solution is currently in development in my own development tenant and not being used in any production environment I am associated with. As a result, the full implementation has not yet been fully worked out. And there is definitely room for improvement - this is just an idea that I recently had and it seemed to work out relatively well. You can find more information about Azure Runbooks on Microsoft's website.
The Reason
Recently I have been involved in more and more Teams administration relating to policy assignment. One of the things I was interested in is determining whether or not policies could be assigned to a Microsoft 365 group. That way users would have policies automatically assigned to them based on their group membership. You would be able to setup groups like "HR", "Project Managers", "IT Admin" etc. When someone joins that group, they would have the policies automatically assigned to them and potentially when they were removed from that group they would be reverted back to Default - that was my hope, but no such luck (at least not with app permissions and app setup).
This leaves you with two options administer these policies in the admin centre, or use a PowerShell script that can be written, adjusted and run when needed. With both options being a manual task, I decided to try make my own solution.
The Example
In this example we will be administering the "Project Manager Policy Group". We want to pin a new Power App, that has been added to Teams, to the left-hand menu in the UI of Teams for all the Project managers.
Before we start, you'll notice that this user does not have anything other than the default apps pinned in Teams. That is because all users are currently assigned the default, Global policy.

Our custom policy is called "Project Management".

The Runbook
Before we can start, we will need a new Azure Subscription. If you are using a free trial to do this, you will need to provide a credit card, but Microsoft will not charge you unless you upgrade your subscription.

With your subscription setup, you will be able to add a new resource group to it.


In the new resource group, you will need to add "Automation" from the Azure Marketplace.


Once you have selected a name and created the Automation Account, it will appear in the resources group.

From the account, you will be able to select "Runbooks" in the left hand menu. This is where we will store our script.

Now that we have our Automation account setup, we need to add two PowerShell modules to be able to run our script. One of these is the Skype for Business module (a lot of Teams administration is run using Skype cmdlets) so you will need to download and install this module before you can create the zip file for upload. Once installed you should be able to find the Skype Package at this local address: "C:\Program Files\Common Files\Skype for Business Online\Modules\".
(Otherwise I have also provided the zip file if you trust me 😁)
Once this has been zipped, you will be able to upload it to the modules section by clicking "Add a module", and selecting the file.

When it has been uploaded, it should appear in search.

The last module you will need for the script is AzureAD. This can be found by searching the PowerShell gallery.

Now that we are setup, we are ready to start putting our solution together.
The Backend
For this solution I used a SharePoint site consisting of three lists.
A Group List
Stores the groups that have been administered, and the details about what policies the groups have been given.
A Policy List
Lists all the policies that can be administered, what category that policy is part of and whether the policy is custom or not.
A Task List
An ordinary SharePoint list to capture the tasks that need to be carried out.
These tasks include adding and removing policies from a group or adding and removing members from a group.

The Power App
Now that we have our backend setup, we can create a basic Power App that is linked to our SharePoint lists. You can use a Gallery linked to the "Microsoft365Groups" connector to select which group you would like to administer.

Using another gallery, we add our Policies list to the app, which will allow us to start filling in a SharePoint form.

The submit button in this case has been allocated the job of submitting the new form, but also creating a task list item using a simple flow.

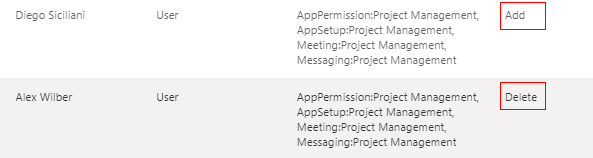
On a separate screen, you will be able to setup a Gallery with the groups that already exist in our SharePoint list (ones we have administered already). Included in the list will be all the policies we have assigned to this group previously. Meaning we can add new users to the group, and capture the polices these users will require. We can also delete the group from our list of groups, returning everyone in the group to default policies.

The Power Automate flows
Upon adding/removing a group to/from our list, or adding/removing a member to/from our group, a basic flow is triggered from our Power App. This flow simply creates a task list item.

The "Operation" and "Task Type" are hardcoded and given to the flow by the Power App.

Once the task item has been created in our list, we use another flow to run our script. The flow is triggered on the SharePoint trigger, "When an item is created" and consists of a single variable to check Job Status, a 'do while loop' and an error handler.
You can also trigger the script directly from the Power App, but be aware that the Azure Automation connection is a premium connector, and as such will have licensing requirements.
The flow is setup to wait for a response from the script, if the script returns a failure, then the JobStatus variable will be set to "Failed". By waiting for the Job Status to return as "Completed", the 'do loop' allows us to rerun the script if there is an initial failure. The script can sometimes fail if there are too many requests sent in a short period of time, this allows us to retry before elevating to our error handler.

Once the script is successful, the Job Status returns "Completed".

If the script fails after a pre-set number of attempts (3 in this example), then the error will be elevated to a Teams channel for further investigation.
We check the JobStatus, if it has remained as "Failed", then we build a link to the failed run and send it to a Teams channel.


A link to the failed run can be built with the below formula.
Find your flow locale in the url of your Power Automate environment.
concat('https://[your flow locale].flow.microsoft.com/manage/environments/',
workflow()?['tags']['environmentName'],
'/flows/',
workflow()?['name'],
'/runs/',
workflow()?['run']['name'])
The Script
In order to authenticate, we will need credentials of some sort. In this example we will be using the credentials storage of your automation account. The credentials will need access to Azure AD, and Teams admin and will be called in the script.


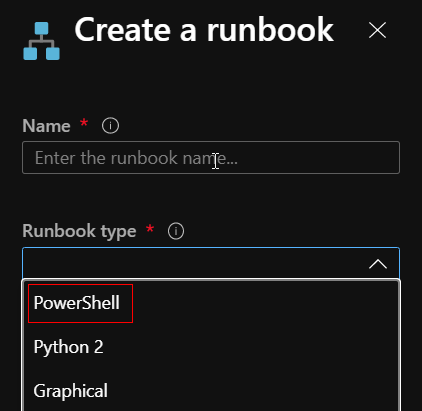
To add your script, navigate back to the Runbooks and click "Create a runbook". Give the Runbook a name and select "PowerShell" for the Runbook type.
Then simply edit and add the below PowerShell script to the new Runbook.
#Improve script by adding Try/Catch block to handle errors within the script
#Get values from the task list via Power Automate
param
(
 [Parameter(Mandatory=$true)]
 [string]$TaskType,
 [Parameter(Mandatory=$true)]
 [string]$Operation,
 [Parameter(Mandatory=$true)]
 [string]$MSID,
 [Parameter(Mandatory=$true)]
 [string]$PolicyString
)

#Get the credentials stored in Azure
$credentials = Get-AutomationPSCredential -Name 'GroupAD'

#Connect and import the Skype modules
$Session = New-CsOnlineSession -Credential $credentials
$importedSession = Import-PSSession $Session -AllowClobber

#Turn the policy string into an array
$Policies = $PolicyString.Split(",")

#Cycle through the Policies in the new array
foreach($Policy in $Policies){

 #Split the policy and load the Catagory and Policy into variables
 $SplitPol = $Policy.Split(":")
 $PolicyGroup = $SplitPol[0].trim()
 $PolicyAssigned = $SplitPol[1].trim()

 #To restore the default policy, use '$null' to remove any assigned policies
 if($PolicyAssigned -eq "Global (Org-wide default)" -Or $Operation -eq "Delete"){$PolicyAssigned = $null}

 if ($TaskType -eq "Group"){

 #Connect to AD and retrieve the members of the group
 $Connect = Connect-AzureAD -Credential $credentials
 $TeamMembers = Get-AzureADGroupMember -ObjectId $MSID -All $true | Where-Object { $_.ObjectType -eq "User" }

 #Cycle through the group members and assign the policy
 foreach ($User in $TeamMembers){

 #Add logic if you want to administer other policies
 if($PolicyGroup -eq "AppSetup"){Grant-CsTeamsAppSetupPolicy -Identity $User.UserPrincipalName  -PolicyName $PolicyAssigned}
 if($PolicyGroup -eq "AppPermission"){Grant-CsTeamsAppPermissionPolicy  -Identity $User.UserPrincipalName  -PolicyName $PolicyAssigned}
 if($PolicyGroup -eq "Meeting"){Grant-CsTeamsMeetingPolicy  -Identity $User.UserPrincipalName  -PolicyName $PolicyAssigned}
 if($PolicyGroup -eq "Messaging"){Grant-CsTeamsMessagingPolicy  -Identity $User.UserPrincipalName  -PolicyName $PolicyAssigned}
 }
 }

 elseif($TaskType -eq "User"){

 #Add logic if you want to administer other policies
 if($PolicyGroup -eq "AppSetup"){Grant-CsTeamsAppSetupPolicy -Identity $MSID -PolicyName $PolicyAssigned}
 if($PolicyGroup -eq "AppPermission"){Grant-CsTeamsAppPermissionPolicy  -Identity $MSID -PolicyName $PolicyAssigned}
 if($PolicyGroup -eq "Meeting"){Grant-CsTeamsMeetingPolicy  -Identity $MSID -PolicyName $PolicyAssigned}
 if($PolicyGroup -eq "Messaging"){Grant-CsTeamsMessagingPolicy  -Identity $MSID -PolicyName $PolicyAssigned}

 }
}

#Remove the Skype session
Remove-PSSession $Session

#All the Teams policies:

 <#Grant-CsTeamsAppSetupPolicy -Identity $User.UserPrincipalName  -PolicyName $PolicyAssigned
    Grant-CsTeamsAppPermissionPolicy -Identity $User.UserPrincipalName  -PolicyName $PolicyAssigned
    Grant-CsTeamsCallingPolicy -Identity $User.UserPrincipalName  -PolicyName $PolicyAssigned
    Grant-CsTeamsCallParkPolicy -Identity $User.UserPrincipalName  -PolicyName $PolicyAssigned
    Grant-CsTeamsChannelsPolicy -Identity $User.UserPrincipalName  -PolicyName $PolicyAssigned
    Grant-CsTeamsComplianceRecordingPolicy -Identity $User.UserPrincipalName  -PolicyName $PolicyAssigned
    Grant-CsTeamsEmergencyCallingPolicy -Identity $User.UserPrincipalName  -PolicyName $PolicyAssigned
    Grant-CsTeamsEmergencyCallingRoutingPolicy -Identity $User.UserPrincipalName  -PolicyName $PolicyAssigned
    Grant-CsTeamsIPPhonePolicy -Identity $User.UserPrincipalName  -PolicyName $PolicyAssigned
    Grant-CsTeamsMeetingBroadcastPolicy -Identity $User.UserPrincipalName  -PolicyName $PolicyAssigned
    Grant-CsTeamsMeetingPolicy -Identity $User.UserPrincipalName  -PolicyName $PolicyAssigned
    Grant-CsTeamsMessagingPolicy -Identity $User.UserPrincipalName  -PolicyName $PolicyAssigned
    Grant-CsTeamsMobilityPolicy -Identity $User.UserPrincipalName  -PolicyName $PolicyAssigned
    Grant-CsTeamsUpgradePolicy -Identity $User.UserPrincipalName  -PolicyName $PolicyAssigned
    Grant-CsTeamsVideoInteropServicePolicy -Identity $User.UserPrincipalName  -PolicyName $PolicyAssigned#>
Once the script has been added to the Runbook, ensure to click "Publish" otherwise it will not be triggered.

The Policy Assignment
Now that we have set up the solution, we can assign policies to the "Project Manager Policy Group". And when we submit and wait for the script to finish running, all the users in our group will have a new option available to them in the left-hand menu of Teams.

Remember that when administering in Teams, changes can take 24 hours to take effect.
The Conclusion
While there is definite room for improvement, this is a great place for Teams admins to start. It allows for a more precise policy assignment strategy and can allow organisations to offer different user experiences depending on user requirements. And by connecting the script to a Power App interface, we can now let non-technical staff handle policy assignment for large groups of users without a need to carry out the laborious task of manually assigning policies to each user, or having PowerShell knowledge.
Another option that can also be considered is the "When a group member is added or removed".
This allows you to capture all members added or removed from a group and negates the need for a Power App, but you would need a flow for each group that is administered.

As this solution improves, I hope to keep this post updated, so please consider coming back to check for updates. And if you have any suggestions then please put them down in the comments. I hope you found this topic as interesting as I have.


Comments