Deep Linking in Power Apps
- Kyle Anderson

- Nov 23, 2020
- 4 min read
Recently I have started using more deep links in apps. Deep linking allows you to send a user to a specific screen in an app, or even a specific record. This becomes incredibly useful in dealing with things like approvals, tasks and reviews. A great use case for deep linking is sending job requests to users in the field. It will allow them to navigate directly to the job they have been assigned.
In this post we'll have a quick look at how you can set this up for use in a browser, then we'll look at how you can send a push notification to a mobile device, and then we'll address how the app processes the link/notification.
For more information on the topic I would recommend watching this video from Shane Young on deep linking.
Deep Linking in a Browser
Sending a link that will allow the user to load the app in a browser is very easy, all we need to do is get the app's link, and then create a parameter to append to the end of the link - easy. To get the link for our app, navigate to the apps page in Power Apps, choose the app that we want and select "Details".

Copy the Web link

Now that we have our link we need to add a parameter, which in this example will be a record ID. Back in our app, I have a simple SharePoint form that will allow us to create a new record. On selecting the form, we will look for the "OnSuccess" property, this will allow us to send our link once the record has been created successfully. In order to create the link and the correspondence, we will take advantage of the "LastSubmit" feature of our form to get the record ID, the record name and the email address of the person we have assigned the newly created record to.
Our record ID - SharePoint ID:
Set(varNewSPID,frmCreateJob.LastSubmit.ID);Email address - we're extracting the email address from a person field in SharePoint:
Set(varAssignTo, frmCreateJob.LastSubmit.'Assign To'.Email);Record name - the "Title" field in this example:
Set(varJobTitle, frmCreateJob.LastSubmit.Title);Our form "frmCreateJob"
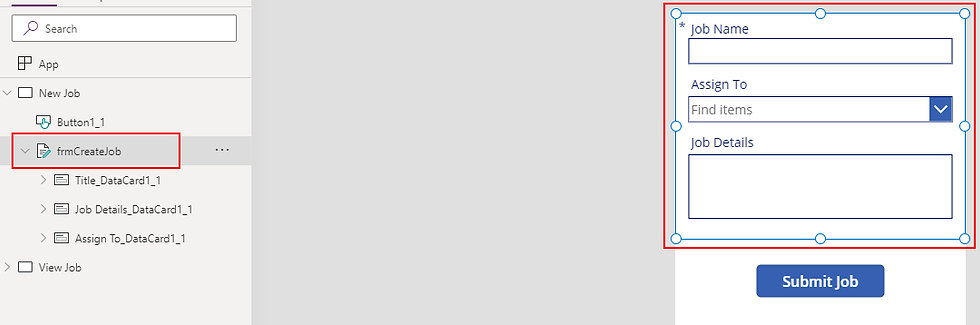
Loading our three variables with our key information

Now that our three variables can be loaded successfully, we can use them to build our email and the link that will be sent out. To do this we'll add the outlook connection and use the "Office365Outlook.SendEmailV2" action.
The link will be using "SPID" as the parameter, and "varNewSPID" will hold the record's ID.
https://apps.powerapps.com/play/e9498ef7-115e-44d7-8018-ecacc64a1d4f?tenantId=<TENANT ID>&SPID=varNewSPID

//Structure of the link below
https://apps.powerapps.com/play/e9498ef7-115e-44d7-8018-ecacc64a1d4f?tenantId=<TENANT ID>&<PARAMETER>=<VALUE>
Full formula to send out email will look as follows
Office365Outlook.SendEmailV2(varAssignTo,"New job: " & varJobTitle, "A new <a href='https://apps.powerapps.com/play/e9498ef7-115e-44d7-8018-ecacc64a1d4f?tenantId=<TENANT ID>&SPID=" & varNewSPID & "'> job </a> has been created for you to look at.");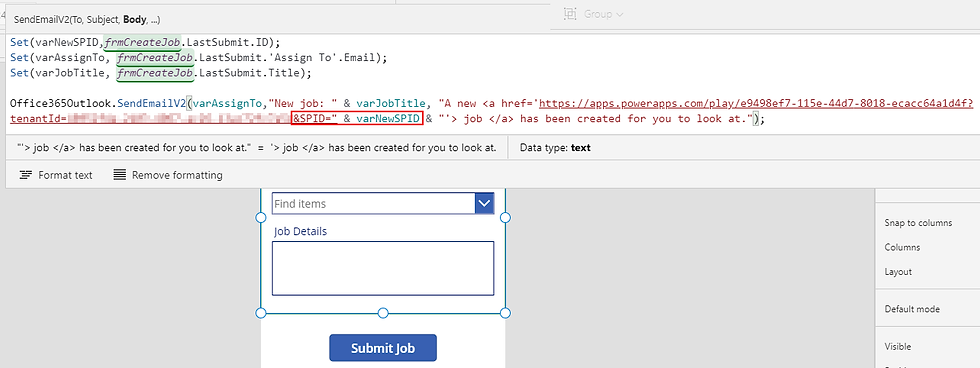
Now that this is setup, we can submit a new record to SharePoint, and it will send an email to the person that the record was assigned to as shown below.

We will look at how this is processed later in this post, but before we do that, we need to address deep linking within mobile push notifications.
Deep Linking on a Mobile Device
Deep linking in a mobile notification works very similarly, but we will use the "PowerAppsNotification" connection.
NOTE: There is a V2 of this connection, but it is still in preview at the time of writing, so we will use the original version for now.

We will create our record and load our variables in exactly the same way, but instead of building a link in an email, we will build our notification. Once again, we will be using "SPID" as our parameter.
PowerAppsNotification.SendPushNotification({recipients:[varAssignTo],message:"New job: " & varJobTitle ,openApp: true, params:({key:"SPID", value: varNewSPID})});
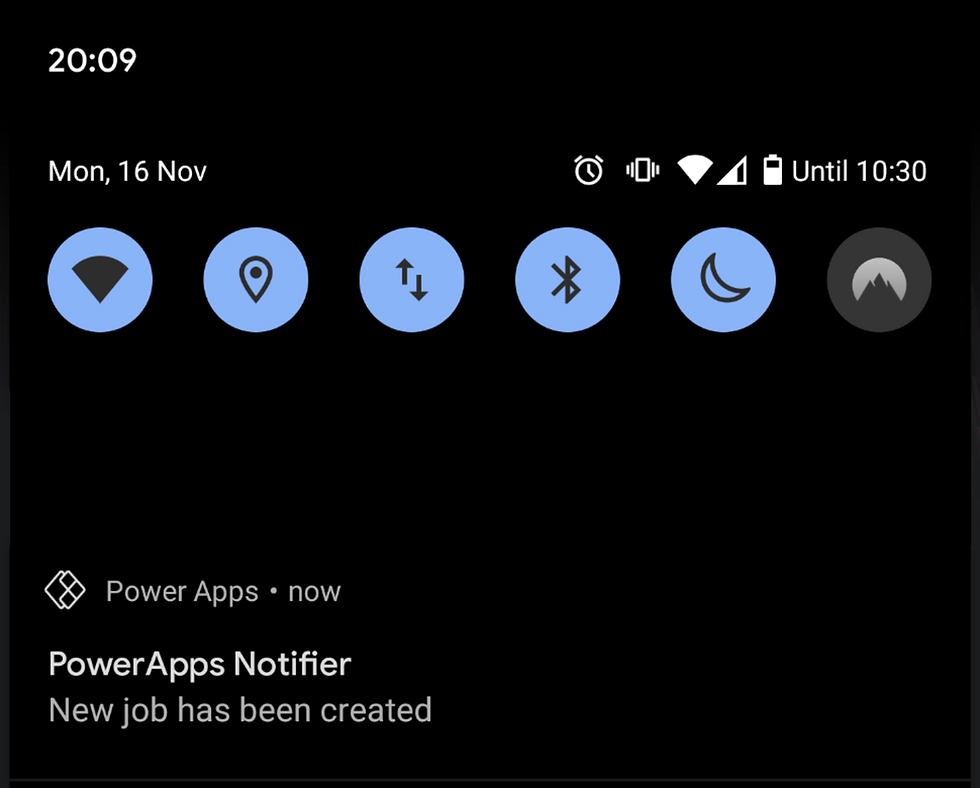
Now when we create our record and submit it

We will get a notification from the PowerApps mobile app. Tapping on this notification will open the app in Power Apps for mobile.
Processing the Parameter
Now that we know how to send our parameter, we need to do something with it. In this example we are using a record ID so we will process it as an integer, but you can adjust the logic to suit your needs.
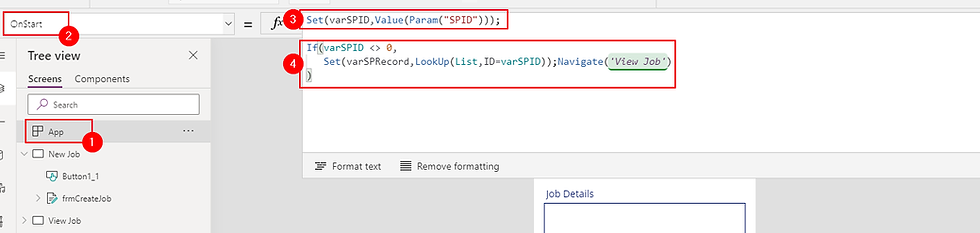
Navigate to "OnStart" in the App and use the following formula to pull out the parameter from our link/notification. We will use the "Param()" function to pull the value down.
//Use "Value()" for integer
Set(varSPID,Value(Param("SPID")));
//If your parameter is text
Set(varSPID,Param("SPID"));
Now that we have loaded our parameter into a variable, we will need to check it's value to make sure that the parameter was actually there, this will prevent issues if the app is loaded from another source, without the parameter. Once we have done our check, we can look for our record using the ID, and then navigate to another screen to view our record.
//Check our integer value
If(varSPID <> 0,
   Set(varSPRecord,LookUp(<DATA SOURCE>,ID=varSPID));Navigate(<SCREEN NAME>)
)
Once that has been setup, the last thing we need to do is make the "Item" property of our display form the variable/record that we loaded in the "OnStart" property of the app.

We can now save and publish this, and open our link/notification that was sent earlier. When the app opens, it will pull the "SPID" parameter down, find the record in our dataset, load the record into the "varSPRecord" variable and navigate to the "View Job" screen where our record will be loaded into our form for further review and action.

In Conclusion
Once you have wrapped your head around how deep linking works, it is an incredible way of sending specific records out to users for approval and review. It allows for a deeper, richer connection between your users and the records that relate to them. It can also allow for better connections between your apps, it could for example allow you to see the same record across applications - the opportunities for connections become quite vast.


Comments