Saving Emails From Power Apps to SharePoint List Items
- Kyle Anderson

- Nov 13, 2020
- 3 min read
Recently, I have been experimenting with the Outlook connector in Power Apps and thought about how a user might use this connector to save emails against records in SharePoint.
In this post we'll look at how you can export and save an email and attach it to a list item in SharePoint (these files can also be saved to a document library).
The Flow
In this example, I stored the name of the email and the email address as the record, but the thing we absolutely need is the message ID. This will allow us to export the specific email and save the content.
We'll use the PowerApps trigger in Power Automate - this will allow us to trigger the Flow from our app. We'll then need to connect our variables to the app by adding "Ask in PowerApps".


Once we have our variables setup, we can use the Message ID to pull and export our specific email. We then create the SharePoint item, and use the "Add attachment" action to complete the process. Notice the name of the email must end with ".eml" to ensure the file is usable. Note that the "ID" being used in the "Add Attachment" action is pulled from the "Create item" action.
@{outputs('Create_item')?['body/ID']}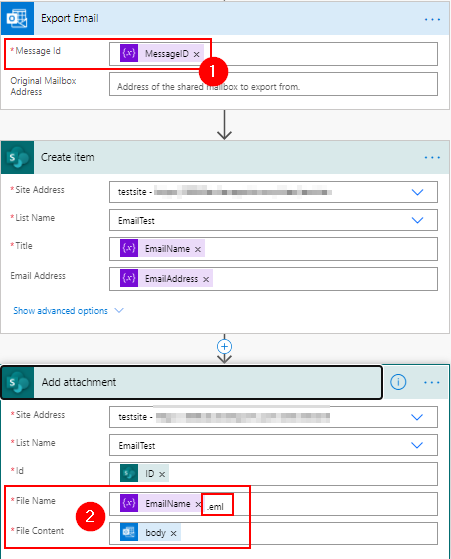
The App
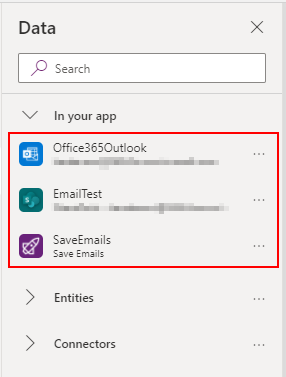
Now that our Flow is setup, we can start putting our app together. We'll start by adding the "Office365Outlook" connector, the SharePoint list that we'll be saving the records to, and the Flow that we created previously.
In order to add the flow, navigate to "Action", "Power Automate" and select the Flow you would like to add to the app.

Once the Flow has been added to a control or other trigger method, it will provide intellisense on what parameters the Flow needs, and in what order.

Now that our connectors and Flow have been setup, we can add a "Flexible Height Gallery" which will automatically scale to the size of our individual emails - we'll also add a label, and an HTML label to the gallery template. Add the following formulas to the gallery and labels:
Gallery
Office365Outlook.GetEmails()Normal label
"From: " & ThisItem.FromHTML label
ThisItem.BodyOnce setup, you will be able to use the gallery to browse your inbox and select the email that you wish to export. By default, you will see the top 10 emails, but you can expand this up to 25 (max at time of writing) using the below.
Office365Outlook.GetEmails({top:25})You can also use the "searchQuery" parameter:
Office365Outlook.GetEmails({top:25,searchQuery:"Search text"})And you can use the "fetchOnlyUnread" parameter:
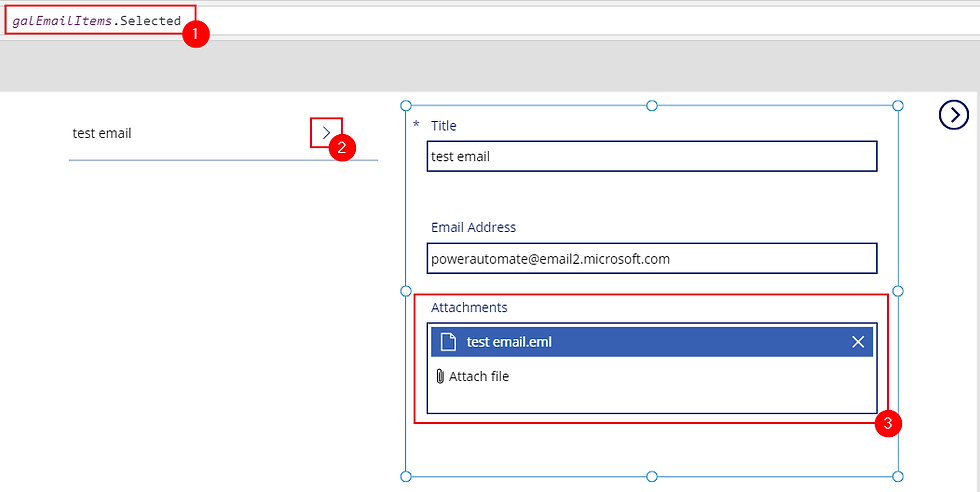
Office365Outlook.GetEmails({top:25,fetchOnlyUnread:true})Once setup, we can select the email we want to export, fill in the "Email Name" text and trigger the Flow which will run and create our item and attachment.
On a separate screen add a gallery to pull out the list items that we created, and add a form that will load in the selected item. From here, we can select the attachment which will allow us to download the export for viewing.
Conclusion
While this post uses SharePoint as a repository for our exported emails, they can also be sent elsewhere. We can, for example send these exports to OneDrive for business - and by using OneDrive for business we can also use the "Convert content" action and turn these emails into PDFs (which would allow you to use the view PDF control in Power Apps). By using this method we can now link any email correspondence with an individual record.


Comments