Creating a Custom Group Connection for Power Automate
- Kyle Anderson

- Oct 15, 2020
- 4 min read
Updated: Oct 16, 2020
If you have never created a custom connector in Power Automate, it can seem a little bit daunting. Not knowing what to create or where to start are the two main barriers of entry, but in this post, we'll look at creating a custom connector that is both easy to create, but also fairly useful.
Our custom connector will be a collection of Microsoft Graph APIs relating to three useful group - get group owners, add group owners and remove group owners.
In order to follow these steps, you will need a global admin account, or you will need to ask your organisation's global admin for assistance.
Granting Our Connector Permissions
Before we actually create the connection, we need to ensure that it will have the correct permissions to perform the actions we want it to perform.
To do this, navigate to portal.azure.com and select "Azure Active Directory"

Select "App registration" and "+ New registration"

Name and register your Azure app.

Once the app has been created, select "API permissions" in the left-hand menu and click "+ Add a permission".

Select "Microsoft Graph", and because the connection will rely on a user signing in, we will use delegated permissions which will provide the "user" elevated permissions through the connection.


When assigning permissions to our app, we should take the theory of least permissions needed. Our app needs to be able to add and remove owners, so we will look for the "Group.ReadWrite.All".

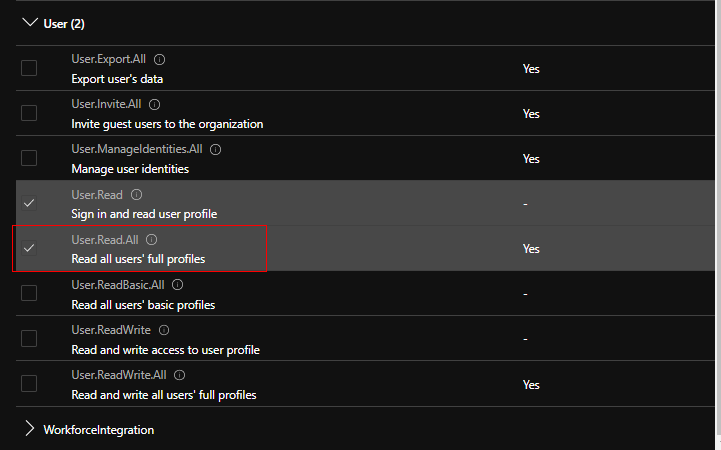
But we only need to read individual accounts, so we'll search for the "User.Read.All"

With those selected, we can save the permissions and authorise them as a global admin.
To do this, select "Grant admin consent for <Tenant>" as the global admin and choose "Yes".

Notice the permissions have been now granted. These permissions can sometimes take a while to take effect.

Now we can navigate to "Certificates & secrets" and select "+ New client secret", choose an expiry period and a name:

With the secret created, make sure you save it somewhere safe because once you navigate away from the screen, there is no way to view the secret again.
Lastly, navigate back to the "Overview" of the app and copy the "Application (client) ID", we will need this to authenticate the connection.

We will need to perform one more task in our app, but we will come back to that once our connector has been authenticated.
Graph Explorer
To create our custom connector we will be using Graph API which we can first test using the graph explorer that can be found here. The nice thing about using this resource is that you can test what permissions are needed for different operations.
Select the cog next to your sign in details and choose "Select permissions". From here you will be able to select a variety of different permissions to test.


For our custom connector we will be using the following APIs:
Get Group Owners:
https://graph.microsoft.com/v1.0/groups/{id}/ownersAdd Group Owner:
https://graph.microsoft.com/v1.0/groups/{GroupId}/owners/$ref

{
  "@odata.id": "https://graph.microsoft.com/v1.0/users/{id}"
}
Remove Group Owner:
https://graph.microsoft.com/v1.0/groups/{GroupID}/owners/{OwnerID}/$refCreating Our Connector
In order to create our connector, navigate to flow.microsoft.com and select "Custom connectors" under the "Data" tab.

Look for "+ New custom connector" and choose "Create from blank". Give your connector a name and click "Continue".


Personalise your connector with an icon, a background colour and description.
In the field labelled "Host*" add the below:
graph.microsoft.com
Once completed, navigate to the security page and complete the following details:
Select "OAuth 2.0"
Select "Azure Active Directory"
Paste in your Application (client) ID that we copied earlier
Paste in the Client secret that we copied earlier
Add in the Graph endpoint - This can be found in the Azure App under "Endpoints"
https://graph.microsoft.com
6. Create the connector
7. Copy the Redirect URL - we will add this to our Azure App next
https://global.consent.azure-apim.net/redirect
Back in the Azure App, select "Redirect URIs: Add a Redirect URI".

Add a platform and select "Web" from the new menu.

Paste in the "Redirect URL" that we copied from the connector in step 7.

Back in the connector, step through to the "Definition" page and select "+ New action".

Get Owners
Add your action details, select "+ Import from sample" under the request section and add in your API as a "GET" request.
https://graph.microsoft.com/v1.0/groups/{id}/owners
Add Owner
Follow the same steps as above, but use the "POST" request and add in the JSON sample to the body.
https://graph.microsoft.com/v1.0/groups/{GroupId}/owners/$ref

{
  "@odata.id": "https://graph.microsoft.com/v1.0/users/{id}"
}

Remove Owner
Follow the same steps, but use the "DELETE" request.
https://graph.microsoft.com/v1.0/groups/{GroupID}/owners/{OwnerID}/$ref
Testing our connection
With our three actions now added to the connector, update the connector and navigate to the "Test" page. Here you will be able to ensure your connector is working before adding it to a flow.
Create a testing connection using your normal account, and test each of the actions using a test group and user ID.

Get Group Owners

Add Group Owner

Remove Group Owner

Using Our Connector
Now that our connection has been tested and we know it's working; we can use it in a flow. Make sure to share the connection with anyone who is using the connection to build flows.

When you go to build a flow, you will find the connection in the "Custom" tab of the "Choose an action" prompt.


You can hardcode or dynamically populate your ID fields.

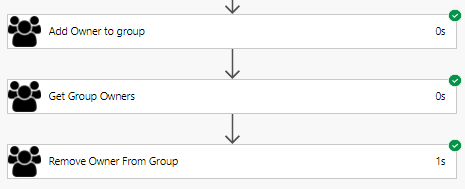
When we run our flow, you can see all 3 actions have been successfully completed.

The "Get Group Owners" action will require you to parse the response through a Parse JSON action to retrieve and work with the various fields it returns.
Conclusion
Now that you have a simple custom connector, you can either build upon it with other actions provided by Microsoft Graph, or explore some of the other APIs available to you to create other new connections. Hopefully this post has helped you take your first steps into creating your own collection of custom connections, and awaken some new ideas for processes and worfflows that you can now create.


Comments